

When you make cards, how about adding a homemade envelope to match???

 Thank you ARCHIVERS, MALL of AMERICA, and all the VENDORS who put on a GREAT ScrapFest this year!! It was wonderful and all the workers were helpful. Can't wait until I get to attend another one!!


 Cut ribbon into 6" strips, making sure to make an angled cut on the ends. Start with one color and tie one to each of the greening pins. Keep adding until you have put every color ribbon on each pin.
 Twist the garland to allow it to lay on the edge of your first finished row, attach with greening pin the same way as the leaves. Keep twisting the garland into smaller circles until you have approx three rows. Again, tie your ribbons on to the tops of the greening pins. Add pins to cover any bear areas. Keep adding the ribbon until the wreath is full looking. Then you are DONE!! You can add a hanger to the back or use it as a candle wreath...or without anything in the middle.

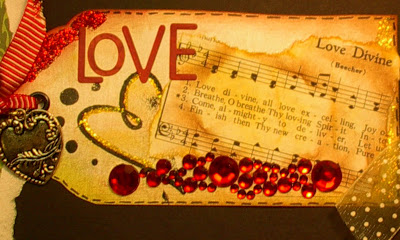
 Above is the close up of the journaling. I did not do anything fancy with the font, I just wrote it out in my own hand using 8 tags. You take your favorite passage and put it on 8 tags starting at the top. Embellish as desired and frame.


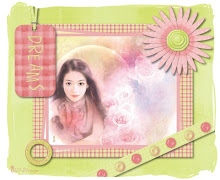
 Hard to believe, this is a self-taken photo of my daughter. In high school, she really got into photography and would experiment with taking photos. This was a good one. Even though it is in black and white, a big blast of color all around will bring your eye to the center. Almost monochromatic, the bold colors add drama. Over doing it on embellishments will draw the eye away from the photo.Try keeping the detail in one area. Notice how there are no embellishments except in the flowers...and they are embellished as much as you want with flowers, button centers with ribbon in the button holes. This one was a lot of fun!!
 This photo turned out very well in black and white. Those big eyes seemed to pop off the page at you and the mood is distinctive...he was tired of grandmama trying to catch a good picture of him! I wore him down!! I wanted the "draw" to be toward his eyes, so I picked black and white papers and embellishments with just a touch of color.

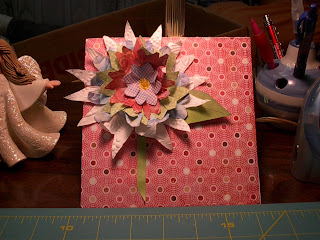
 Start with a square piece of paper, not card stock, doublesided if you have any. The larger the square, the larger the flower will be. Fold, corner to corner. Keep folding until you have a "ice cream cone" shape.


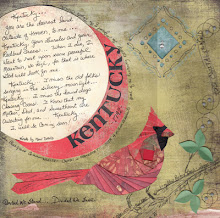
 Here is the page I submitted for "Mother's Day" of my Great Grandmother, Martelia Clementine Trent Fox. I never knew her, but my mother did and had nothing but wonderful stories about her.
  This is a 12"x 12" sheet of card stock folded in half and then cut in half to create two folded 6"x 6" cards. Folding the white to the inside for journaling. You can get two entries in one card (four for each 12"x 12" sheet) if you embellish the front and write on one flap of the inside. The next time you can embellish the back side and write on the other flap. By the end of the project (Dec 2009) you will be able to use the folded spine to create a way to bind them together. I am thinking of using a altered can (or tube of some sort) with ribbon around the inside (both ends cut out) and then inserting the pages into the ribbons.

 http://triplethescraps.blogspot.com/


 These designs are copyrighted and privately owned by DEBRA A. REITZ. Scraplifting is permitted with CREDIT GIVEN to Designs-by-Debra or Debra A. Reitz.
DON'T MAKE ME COME OVER THERE AND STEP ON YOU!!!
These designs are copyrighted and privately owned by DEBRA A. REITZ. Scraplifting is permitted with CREDIT GIVEN to Designs-by-Debra or Debra A. Reitz.
DON'T MAKE ME COME OVER THERE AND STEP ON YOU!!!


